Last week-end I participated in a great painting workshop at Cassioplay, instructed by the great master Mohamed Ait Mehdi.
It was really awesome, and in order to not forget the amazing techniques and tips, I’ll try this step-by-step tutorial.
Note: I couldn’t post earlier, as the miniature that we painted was a preview not yet announced by Taban. So I have to wait the release to post.
The miniature: for our class, we used the miniature of Chelsea, from the Resistance faction of the Eden game. Normally all the miniatures from that game are in metal, but to have a fine result, we worked in a resin version.
 |
| This is the model (painted by the studio), not the miniature that I painted! |
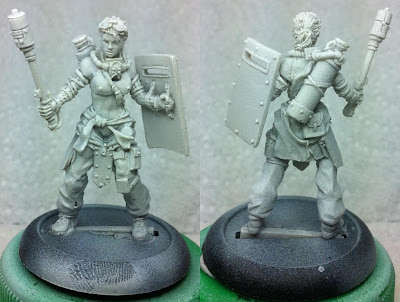
Step One: Preparation
The miniature was in three parts: the right arm (armed with a sort of energy mace), the left arm (with an iron shield) and the rest of the body.
We started cleaning the molding lines. To do that, first you must analyze very carefully both sides of the piece, as it’s possible to have a step between both sides, and if you just look the side more elevated, you could miss a spot.
Also, it’s very important to see a picture of the miniature before cleaning, so you don’t ‘clean out’ a detail that you thought was a fault. In this miniature, there’s a cord that come out of one armor plate in to the leg, and I almost cut it out.
To clean the lines, use a ‘real’ hobby knife, with an unharmed blade. Touch the miniature with it in a 45° angle, and pass it very lightly in the line in the opposite direction of the blade. If there’s a difficult part (like between two folds of the clothes), try to cut the line out in one clean stroke instead.
After cleaning the pieces, assemble it with glue.
For resin miniatures, you must avoid pinning the pieces. As the resin is fragile, the pin will do more harm than good if forced, breaking deep into the miniature.
Tip: FRAGILE! When working with resin miniatures, always be careful because it’s very fragile. If you’re going to cut out the strip between the feet, you should cut it in the middle before cutting beneath the feet. If you don’t do that, I risk that the stress break the other foot.

Step Two: Priming
Before start painting, you should prime the miniature. We used white prime for this miniature.
To prime, you must put the miniature at 15 cm of the spray. Instead of pressing the valve until all the paint is gone, you should do little sprays, always moving the miniature in the arc of the spray (like the women that throw the perfume in the air and walk in). Take care to not spray too much, because a thick layer of primer can ruin the details. Spray only enough so the acrylic paint can attach to the miniature.
After the primer is dry, attach the miniature to something so you have a nice handle (an empty paint pot, a cork).
Step Three: Base Color
The base colors for this miniature were:
Clothes: MACHARIUS SOLAR ORANGE (GW);
Metal: CODEX GREY (GW);
Skin: TALLARN FLESH (GW);
Leather and hair: CALTHAN BROWN (GW);
Hair: SNAKEBITE LEATHER (GW).
Just paint each area, leaving a solid and opaque color, without a thick layer of paint.
Start from the inside to outside, as you’re dressing up the miniature: the skin first, then de clothes, then the accessories. In this way, you avoid messing the skin when painting the clothes, as the skin is on a lower level than the clothes.
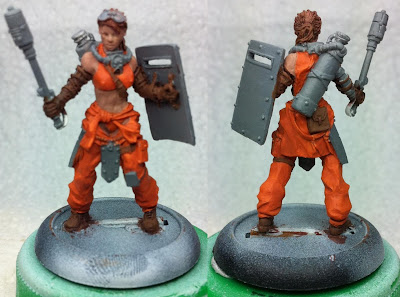
Step Four: Shadowing the Clothes
So far, so good! None of the previous phases demanded anything genius. But now the story takes a turn!
I always shadow my miniatures with a generous wash. It’s fast and even a stoned monkey can do it.
The problem is that you can’t control the pigments to assure a nice shadow, because they tend to flow to the base of the miniature (damned gravity!).
So, to make a good shadow, you must paint the shadow. For it, we used DARK FLESH (GW) diluted.
To do that, you must follow this procedure: first, take some paint from the pot and put in the pallet; clean the brush from all the paint; stroke the moist brush lightly almost horizontally in a paper towel to take the excess of water and to point it; touch the border of the paint stain and start to water down the paint with rounded movements, away from the stain, so you can control the mixture between water and paint.
To do the shadow, you must have a transparent film tainted in DARK FLESH, thin enough to make the different without covering all the base color.
Where apply it? You must analyze the miniature and try to identify the shadow areas. A good way to do that is to look on the top of the miniature, and any place that you don’t see, it’s a shadow area.
In that miniature: the bottom of the breasts, the folds in the slip, the rear of the knees. Your shadow should cover about 1/3 of the area.
How to apply it? Define the areas to shadow, and stroke if the brush, always pushing the pigments in the direction of the area that should be de darkest. The darkest area should be in DARK FLESH, and you must build the color transition until the base color as smoothest as possible.

Step Five: Lining
In this step, we’re going to delimitate every component of the miniature. That means drawing a line between two elements so the person seeing the miniature could visualize every component.
To do that, we dilute CHAOS BLACK (GW) and with a very pointy brush, draw a black line in the junction of each different part, like the between the cloth and the skin, between the sleeve of the slip and the trousers.
That’s all for the first day! I’ll try to finish second day as soon as possible, but I’ll leave the photos anyway.


